
Masterbuilt Butterball Fryer Manual: A Comprehensive Guide
This detailed manual, covering the MB23010618 model, offers essential guidance for safe and successful frying, from setup to cleanup, ensuring delicious results.
Welcome to the world of flavorful, perfectly fried foods with your new Butterball Masterbuilt Electric Fryer, model MB23010618! This fryer is designed for convenient and safe outdoor cooking, particularly renowned for delivering incredibly moist and delicious turkey. This comprehensive manual serves as your guide, providing detailed instructions on assembly, operation, maintenance, and troubleshooting.
Before your first use, carefully review this manual to understand all safety precautions and operating procedures. The 32-page PDF manual, readily available online, details the fryer’s features and functionality. Proper understanding will ensure optimal performance and longevity of your appliance, allowing you to enjoy countless meals with family and friends. Let’s begin your frying journey!
Understanding Your Fryer Model (MB23010618)
The Butterball Masterbuilt Electric Fryer, specifically model MB23010618, is a mobile unit designed for outdoor use. This fryer boasts a generous oil capacity, ideal for submerging a whole turkey or large batches of other foods. The unit’s construction prioritizes safety and ease of use, featuring a robust design and intuitive controls.
This model’s PDF manual (approximately 17.5MB in size) provides a detailed component overview. Familiarize yourself with each part – from the pot and basket to the temperature controls and safety features. Understanding these components is crucial for proper assembly, operation, and maintenance, ensuring years of reliable performance. The manual is a valuable resource for maximizing your frying experience.
Safety First: Important Precautions
Prioritize safety when using your Butterball fryer! Carefully review all guidelines regarding electrical connections, oil handling, and general operation before each use.
General Safety Guidelines
Always operate your Butterball Masterbuilt fryer outdoors, away from any structures, flammable materials, and pedestrian traffic. Maintain a clear safety zone of at least 10 feet around the unit during operation. Never leave the fryer unattended while it is heated or in use; constant supervision is crucial.
Ensure the fryer is placed on a stable, level, non-combustible surface. Do not operate the fryer on grass, wooden decks, or uneven ground. Keep children and pets away from the hot oil and fryer at all times. Wear appropriate safety gear, including long sleeves, gloves, and eye protection, to prevent burns. Be extremely cautious when handling hot oil, and never overfill the fryer beyond the indicated maximum fill line.
Electrical Safety Instructions
This Butterball Masterbuilt fryer requires a grounded electrical outlet. Never operate the fryer with a damaged cord or plug. If the electrical cord is damaged, it must be replaced by a qualified technician to avoid hazards. Avoid using extension cords whenever possible; if one is necessary, ensure it’s a heavy-duty, outdoor-rated cord with sufficient amperage.
Do not operate the fryer during electrical storms or in wet conditions. Keep the electrical components dry and protected from moisture. Always unplug the fryer from the outlet when not in use, before cleaning, and during storage. Never immerse the fryer base, cord, or plug in water or any other liquid. Ensure the outlet is compatible with the fryer’s voltage requirements.
Oil Safety & Handling
Hot oil presents a significant burn hazard. Always exercise extreme caution when handling hot oil. Never leave the fryer unattended while in operation. Ensure the food is completely thawed and dry before carefully lowering it into the hot oil to prevent splattering and boil-over. Use appropriate frying accessories, like a basket with a hook, to safely lower and raise food.
Never overfill the fryer with oil, adhering to the maximum fill line indicated on the unit. Keep a fire extinguisher (Class B) nearby, specifically designed for grease fires. Do not attempt to move the fryer while it contains hot oil. Allow the oil to cool completely before draining or disposing of it properly.

Setting Up Your Fryer
Proper setup involves unboxing all components, carefully assembling the fryer, and conducting an initial inspection to guarantee safe and optimal performance.
Unboxing and Component Checklist
Upon receiving your Butterball Masterbuilt Electric Fryer (MB23010618), carefully inspect the packaging for any signs of damage during transit. Once opened, verify that all components are present. This includes the fryer pot itself, the heating unit, the control panel, the lid, the thermometer probe, the lifting hook, and the user manual – a 32-page document providing detailed instructions;
Ensure you have the power cord and any included accessories. Cross-reference the contents with the parts list in this manual. If any items are missing or damaged, immediately contact Masterbuilt customer support for assistance. Retain the original packaging for potential returns or warranty claims. A thorough component check before assembly prevents issues later.
Assembling the Fryer
Begin assembly by carefully attaching the heating unit to the fryer pot, ensuring a secure and stable connection. Next, connect the control panel, verifying all wires are properly aligned and fastened. Place the lid onto the pot, confirming a snug fit to maintain consistent temperatures during frying. Attach the lifting hook to its designated point on the fryer, crucial for safely lowering and raising food.
Double-check all connections for tightness and stability before proceeding. Refer to the detailed diagrams within the 32-page manual for visual guidance. Proper assembly is vital for safe and efficient operation of your MB23010618 fryer.
Initial Inspection & Testing
Before your first use, thoroughly inspect the fryer for any shipping damage or missing parts. Confirm the heating element is intact and securely attached. Perform a test run by filling the pot with water (never oil for initial testing!) to the ‘fill line’ and setting the temperature to 350°F (177°C).
Observe the heating element to ensure it functions correctly and the temperature control accurately regulates the water temperature. This initial test, detailed in the manual’s 32 pages, verifies operational safety. Discard the test water and thoroughly dry the fryer before using it with oil.

Operating Instructions
Proper operation involves carefully filling the fryer with oil, precisely controlling the temperature settings, and following step-by-step frying procedures for optimal results.
Filling the Fryer with Oil
Before commencing any frying operation, accurately filling the fryer with the appropriate oil is paramount for safety and achieving consistently excellent results. Always ensure the fryer is positioned on a level, stable surface and completely cool before adding oil. Utilize a high smoke point oil, such as peanut or canola oil, specifically recommended for turkey frying.

To determine the correct oil level, place your intended food item (turkey, chicken, etc.) within the frying basket and lower it into the empty fryer pot. Fill the pot with water until the food is fully submerged, then remove the food and carefully dry the pot. The water level previously reached indicates the maximum safe oil fill line. Never overfill the fryer, as this can lead to dangerous oil overflow during operation. Always double-check the oil level before heating.
Temperature Control & Settings
The Masterbuilt Butterball fryer features precise temperature control, crucial for safe and effective cooking. The digital display allows you to set the desired frying temperature, typically between 250°F and 375°F, depending on the food being prepared. Utilize the “Temperature” buttons to adjust the setting in small increments;
Allow the fryer sufficient time to reach the set temperature before adding food – this usually takes 30-45 minutes. Maintaining a consistent temperature is vital; fluctuations can result in unevenly cooked food or compromised safety. The fryer will automatically cycle to maintain the set point. Regularly monitor the temperature displayed and adjust as needed to ensure optimal frying conditions throughout the cooking process.
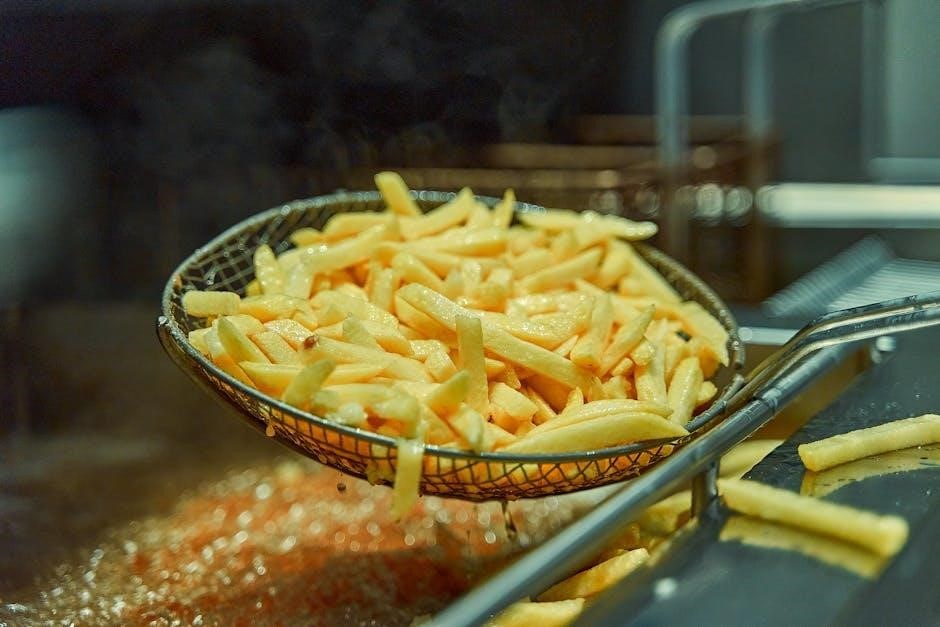
Frying Procedures – Step-by-Step
Begin by ensuring the oil has reached the desired temperature and the food is thoroughly thawed and patted dry. Slowly and carefully lower the food into the hot oil using a fryer basket or hook, avoiding splashing. Do not overcrowd the fryer; work in batches to maintain oil temperature and ensure even cooking.
Monitor the cooking time closely, referencing recommended times (see section on cooking times). Use a meat thermometer to verify internal temperature. Once cooked, carefully remove the food from the oil and place it on a wire rack to drain excess oil. Always exercise extreme caution when handling hot oil and cooked food.

Cooking with Your Butterball Fryer
Explore diverse recipes! This section details recommended cooking times and temperatures for turkey, chicken, fish, and other favorites, maximizing flavor and safety.
Recommended Cooking Times & Temperatures
Achieving perfectly cooked food with your Butterball fryer relies on precise timing and temperature control. This guide provides a starting point, but always verify internal temperatures with a meat thermometer for safety. For a 12-14 pound turkey, aim for 3-4 minutes per pound at 350°F. Chicken pieces typically require 6-8 minutes, while fish cooks in just 3-5 minutes.
Remember these are estimates; factors like oil temperature consistency and food size impact results. Always maintain oil temperature within the recommended range. Lower temperatures lead to greasy food, while excessively high temperatures can cause burning. Refer to specific recipe guidelines for optimal cooking parameters and ensure thorough cooking to eliminate harmful bacteria. Prioritize food safety!
Frying Turkey – A Detailed Guide
Preparing a turkey for frying requires careful attention. Ensure the turkey is completely thawed – allow approximately 24 hours per 5 pounds in the refrigerator. Remove giblets and neck. Pat the turkey completely dry, inside and out, as excess moisture causes dangerous splattering. Do not overfill the fryer with oil; a displacement test with the turkey is crucial.
Slowly and carefully lower the turkey into the preheated 350°F oil. Maintain this temperature throughout the 3-4 minutes per pound cooking time. Once cooked, carefully remove the turkey and allow it to drain before carving. Always use appropriate safety gear, including oven mitts and eye protection, during the entire process.
Frying Other Foods (Chicken, Fish, etc.)
The Butterball fryer isn’t limited to turkey! Chicken pieces, fish fillets, and even vegetables can be deliciously fried. Adjust cooking times based on the food’s thickness and density. Generally, chicken requires 6-8 minutes, while fish takes 3-5 minutes. Always ensure food is fully submerged in the 350°F oil.
For best results, lightly bread or batter your chosen food. Avoid overcrowding the fryer basket, as this lowers the oil temperature and results in uneven cooking. Monitor the oil temperature closely and adjust as needed. Remember safety precautions apply to all frying endeavors – use caution and appropriate tools.

Cleaning and Maintenance
Proper post-frying cleaning, oil disposal, and storage are crucial for maintaining your Butterball fryer’s longevity and ensuring optimal performance for years.
Post-Frying Cleaning Procedures
Allow the fryer to cool completely before beginning any cleaning process – this is paramount for safety. Carefully remove all food debris from the fryer pot and basket. Dispose of used oil responsibly, following local regulations for oil recycling or disposal; never pour it down the drain.
Wash the pot, basket, and any other removable parts with warm, soapy water. Avoid abrasive cleaners that could damage the non-stick coating. Thoroughly rinse and dry all components before reassembling. Wipe down the exterior of the fryer with a damp cloth.
Inspect the heating element for any food residue and gently clean if necessary. Ensure all parts are completely dry before storing to prevent rust or corrosion. Regular cleaning extends the life of your fryer and maintains food safety.
Oil Disposal & Recycling
Proper oil disposal is crucial for environmental responsibility and preventing plumbing issues. Never pour used frying oil down the drain – it can cause significant blockages. Allow the oil to cool completely before handling. Carefully pour the cooled oil into a sealed, leak-proof container, such as the original oil container or a sturdy plastic jug.
Check with your local waste management services for designated oil recycling locations. Many communities offer oil recycling programs, converting used oil into biofuel. If recycling isn’t available, dispose of the sealed container with your regular trash, following local guidelines.
Consider using oil filters to extend the life of your oil, reducing disposal frequency.
Storage Instructions
Before storing your Butterball fryer, ensure it is completely cool, clean, and dry. Disconnect the power cord and store it separately to prevent accidental activation. Clean the fryer pot and all removable parts thoroughly, removing any residual oil or food particles.
Store the fryer in a cool, dry, and well-ventilated area, away from direct sunlight and extreme temperatures. Protect it from the elements if stored outdoors, using a suitable cover. Ensure the storage location is stable and prevents the fryer from tipping over.
Keep the manual readily available for future reference. Proper storage extends the lifespan of your fryer.

Troubleshooting Common Issues
This section addresses frequent problems like heating failures, temperature inconsistencies, and oil overflows, providing solutions for a smooth frying experience.
Fryer Not Heating
If your Butterball Masterbuilt fryer isn’t heating, begin by verifying the power supply. Ensure the unit is securely plugged into a functioning electrical outlet, and that the outlet isn’t controlled by a tripped breaker or blown fuse. Check the power cord itself for any visible damage – cuts, fraying, or exposed wires.
Next, confirm the thermostat is properly set and hasn’t been accidentally turned off. Some models feature a reset button; consult your manual to locate and activate it if applicable. If these steps don’t resolve the issue, the heating element itself may be faulty, requiring professional repair or replacement. Do not attempt to disassemble or repair the fryer yourself, as this could void the warranty and pose a safety hazard.
Temperature Fluctuations
Experiencing temperature swings during frying? Several factors could be at play. First, ensure the fryer isn’t overloaded, as adding too much food simultaneously can drastically lower the oil temperature. External conditions, like a cold environment or a strong breeze, can also impact heat retention.
Verify the lid is securely in place during operation, as it helps maintain consistent temperatures. If fluctuations persist, the thermostat might be malfunctioning and require calibration or replacement. Regularly check the oil level; insufficient oil can lead to uneven heating. Finally, ensure the fryer is placed on a level surface for optimal performance and accurate temperature readings.
Oil Overflow Prevention
Preventing oil overflow is crucial for safety and a mess-free frying experience. Always determine the correct oil level before adding food – fully submerge the item, but leave ample space (typically several inches) between the oil surface and the maximum fill line.
Avoid thawing frozen foods completely before frying, as ice crystals rapidly expand in hot oil. Pat food dry thoroughly to minimize splattering and displacement. Introduce food slowly and carefully to avoid sudden bubbling. Never overfill the fryer basket, and monitor the oil level throughout the cooking process. Regularly check for any obstructions in the drain valve.

Warranty Information
Masterbuilt provides a warranty covering manufacturing defects on your fryer; details regarding duration and coverage are outlined within the manual itself.
Masterbuilt Warranty Details
Masterbuilt stands behind the quality of its Butterball fryers, offering a limited warranty to protect against defects in materials and workmanship. The warranty period typically begins from the date of original purchase. It’s crucial to retain your proof of purchase for warranty claims.
The warranty generally covers components that fail during normal use, excluding items subject to wear and tear, such as heating elements or oil. Damage resulting from misuse, accidents, or unauthorized modifications voids the warranty.
To initiate a warranty claim, customers should contact Masterbuilt’s customer support team, providing details of the issue and proof of purchase. Masterbuilt will then assess the claim and determine the appropriate resolution, which may include repair or replacement of the defective part. Full warranty terms are detailed in the product manual.
Contacting Customer Support
For assistance with your Butterball Masterbuilt fryer, or to address any questions regarding operation, maintenance, or warranty claims, Masterbuilt provides several avenues for customer support. Their dedicated team is equipped to handle a wide range of inquiries, ensuring a positive user experience.
Customers can reach Masterbuilt’s support team via phone during business hours, or through their official website, which features a comprehensive FAQ section and a contact form. Email support is also available for non-urgent matters.
When contacting support, having your fryer model number (MB23010618) and proof of purchase readily available will expedite the process. Masterbuilt aims to provide prompt and helpful assistance to all its customers.